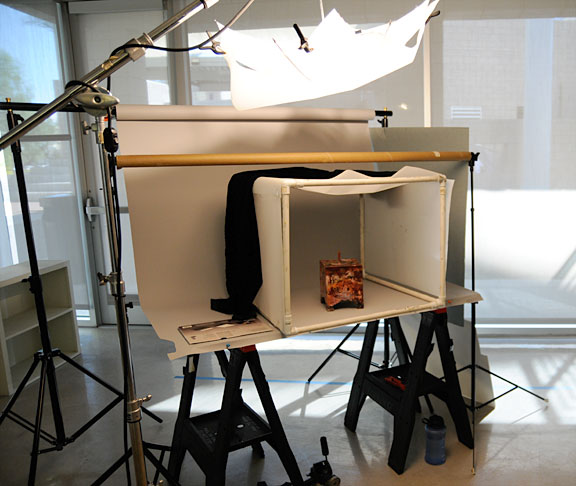
Sunday, November 14, 2010

Goings on

Ingrid and I took a workshop at MAC with Michael Healey a couple of weeks ago on how to photograph your 3d artwork. It was really helpful and I not only learned a great deal about optimal setup and equipment, I also found some new features on my camera that I hadn't known about- go figure.  Since I actually do product photography as part of my job at the Heard, my main goal in taking this class was to learn about what equipment I need to request for the budget next year as well as optimal setup and how I can achieve better quality images in camera so I don't have to do quite as much Photoshop work to get the pics ready to upload to the online shop. So here's Michael's basic setup:

Michael's set up
He sets up a good solid wood board on horses then has a bar across the back with a photo paper roll (he uses a light gray) which then gets pulled down in a nice arc and taped to the front of the board. He usually uses one light which is just over and in front of the set up. The trick to getting a dark fall off going up the image is to put a shade structure up over the set up so light hits the piece but not the background as it goes vertical. Very clever. He also has the background a good distance away from the piece so depth of field is just on the work which allows the background to just fade into non-detailed darkness, which is also very clever.

An example of how Michael's photography looks with this set up

My set up at work involves a gifted piece of black photo paper (I need to get with my boss and see about ordering some rolls- they aren't that pricey) and two lights with umbrellas. I turn the lights completely up facing the ceiling and that causes the light to bounce back off the ceiling and the umbrellas to diffuse the photo area. It reverses my light to dark though so the floor of the set up is dark and the vertical wall gets lighter.  I'm sure I can rig something up to mimic Michael's set up but it may have to wait until after high season because I'm way too busy having to get product online right now to take time out to mess with the set up.

my set up
Looks a bit on the minimal side, doesn't it? Amazingly it gets the job done 9 times out of 10.  One thing I also learned in Michael's workshop is that he can spend quite a bit of time problem solving the set up to get the very best quality shot he can. And he does and it looks amazing. On any given day I may need to put anywhere from 10-40 pieces on the web and that's on top of processing orders, taking phone calls and emails that are all over the place topic-wise and preparing the content to go online as well.  I have to have a setup that is sort of a one size fits all, which is not optimal, but I'm amazed that I'm doing as well as I am considering all its shortcomings.  Here's an example shot:


This was shot in my light tent, which I don't like but it's not bad, eh? I'll have to take a pic of what my light tent looks like but here's what Michael uses for a light tent:

Michael's home made light tent- pvc and a vellum-like heat resistant photo film used in theatre
The only reason I don't like my light tent is because they designed it with velcro as well as zippers and the velcro is constantly shedding little white fluff all over my black paper! Apart from that, it's okay. Here's a typical example of a product shot not in a light tent. You can see how the background gets lighter and the "floor" is dark.


Another issue with my set up is that I don't have time to measure for optimal depth of field so I just have to crank up the depth of field as high as possible to accommodate the different sized pieces and different focal lengths I need to get the shot. I can't back away from my setup by more than 4 or 5 feet, so the background is almost always in focus. That makes for additional grain in the image no matter what the ISO but for me right now it's unavoidable. Here's the other side of my office/ studio:


Michael's class was really great and also allowed me to see that I was doing some things as well as I could so I've stopped beating myself up a bit on the struggle to get good shots. Even with all of his expertise and the right equipment, he still struggles with getting the best shots possible.  And for you jeweler's out there, he says that's the hardest stuff he ever has to shoot! I think he's planning on teaching it in the spring (it's a weekend workshop) and I highly recommend it if you need better shots of your work for shows or galleries and you need to take them yourself.  If you can afford not to have to take them yourself, I recommend you hire  Michael because he's really good :-)

About equipment: the product shots you see here that I took were shot with an old Nikon d40 with a Nikkor ~17-55mm lens. My lights are tungsten lights. The camera ISO is set to 200 and to Aperture mode. I have the white balance set to incandescent +2, which means tungsten on this camera. I adjust the exposure rather than the shutter speed to bracket because that's faster. I do not have an external light meter. Every image is brought into Photoshop CS4. The most common adjustments outside of cropping and sizing for the web are levels and selective color (using layers). I also do a lot of background fuzz cleanup with the patch tool.  BTW, sizing for the web means reducing the dpi to 72, which is the highest resolution for the web.  You do not want an image that is 300 dpi ever to go up onto the web. It just hogs memory and causes the whole system to bog down. I also bring the image width and height down and compress all jpegs for web viewing. The quality is usually between 60-80%.

My personal camera is a Nikon D300 and my main lens is a Tamron 17-55mm, which I love. All the other photos as well as just about any photo you see here or on my design website was shot with the D300.  My next big purchase for photography is going to be a tripod over a flash. I learned another thing in Michael's class, keeping the ISO down makes for better photos but that also frequently makes for longer exposures. I need a tripod for a lot of the work I really like to do.  As of my research right now, I'm leaning towards an RRS ball head with quick release plate and I'm pretty sure I'll get that but the legs I really want are from Gtizo and they are quite pricey so I may go with an Induro set for about half the cost. I think they'll work out just fine.  That little gift to self will have to wait until after the holidays though :-)  Sigh, something to dream about....

Saturday, November 13, 2010

I just can't resist

I stood in line this afternoon to meet Red Green at an Ace Hardware all the way across town in Litchfield Park.  The 20 seconds of actually meeting him was totally worth the hour in line :-)

Sunday, November 7, 2010

Whole lotta goings on, no pics yet

Well, it's been an eventful week. The same weekend as the All Souls Show I took a photography workshop from Michael Healey at the Mesa Arts Center on photographing 3d artwork, which was really great.  My main goal was to glean information to make my photography at the Heard go faster and better and I think I accomplished that objective. Unfortunately, I discovered that a different setup would help tremendously but there's no money in the budget to get one until next October.  I also discovered that I'm doing a lot of things right, too, so that was nice to know.

Last weekend, after having all the other October weekends booked, I promised Mike that I'd clear the schedule for him so I did.  Polly really could have used some more help at the Day of the Dead event Sat/Sun at MAC and I felt really bad about saying no but I'd already promised Mike I wouldn't work yet another weekend.  However, Lynette took over creating the project for demo/ hands-on and they all (Holly and Jonathan) worked their keisters off to make it happen and by all accounts it was a great success.  So Saturday I don't actually remember what went on during the day but we did go to Whole Foods and get fixin's for dinner and Mike grilled a duck, which was incredibly delicious along with eggplant from the garden and we also had polenta and salad. Sunday we had a lovely lazy morning and then went for a hike at South Mountain in the late afternoon. We got home just in time to hand out candy to the trick-or-treaters and spent the rest of the evening doing piddly stuff to get ready for the week.

And now back to work...  Friday night was First Friday and the Phoenix Center Metals Show so I had to see that then I went out with a good friend to catch up on life for a couple of hours, which was wonderful.  This Saturday was the Heard's Weaver's Market where Navajo weavers come from all over the region to sell their rugs directly. I worked the morning as the shop photographer, talking to the weavers, taking photos of them with their work and taking photos of the event in general, then I had to boogie back to Tempe to see the last few minutes of a Saturday art show that my step son was in (his mom is at ASU doing a teaching certificate and she and I guess other art ed students taught  these several weeks long Saturday morning kids art classes and this was the final day/ show for what the kids had done), pick him up and then go run errands. Today, Mike and I have to start hashing out the design of the kitchen for the new house (I've put a time limit on that because we tend to end up in a heated argument... anyone else ever done renovation know what I'm talking about? :-) ) then I'm headed to the studio for hopefully about 6 hours to get some much needed/ desired work in!  Woohoo!!!  I've got several pieces in process and one older piece I want to redesign.  I had thought I might go down to Tucson for the All Souls Procession tonight but I just don't have the energy.  I've got to plan ahead for that kind of thing....

And this morning I finally wrote back to the Midwest Metalsmiths about possibly doing a weekend workshop for them next year. They asked about painting enamel but I also suggested the hammer stone setting class.  Thank you Andrew!!!  I hope we can work something out.  I so love to teach and it would be fun to go somewhere new.  I'll keep you posted!  Next week I expect to have some photos of my adventures as well as pics of what I'm working on in the studio.  I'll try to remember to repeat this then but if anyone ever has process questions about a piece I show, please feel free to ask it. In addition, if there's anything technical you'd like me to address, please let me know and I can get photos together to talk about it.  Have a great week and make some art!

Sunday, October 31, 2010

On another note....

This blog is about my shenanigans as an overall artist, not just in metals so I'm thrilled to share that I got into my first photography show!  The show is: All Souls Procession 4th Annual Photography Exhibition Competition. It was curated by Terry Etherton, who is a big name in photography (I did not know this until I looked him up) so that was cool and out of about 128 submissions, only 25 were picked, so that felt pretty good as well.  The opening was October 22 but it's running through November 7 in conjunction with the All Souls Procession in Tucson. You can learn more about the show and the Procession here.

Both pieces were digital collages of original photos I took in Flagstaff at the memorial of an old friend of my husband, Maria Ruiz, who died suddenly from an embolism, I believe. She was only 49. I had only met her once but liked her instantly. She was warm and welcoming and funny and just a great spirit. The turnout at her memorial, which was held at her cafe in Flagstaff was a testament to the tremendous love she inspired. The theme of the show was not only the All Soul's Procession but about honoring the dead and I hope I did her justice.

 
This time lapse video was sent to me by the organizer who compressed the
opening night reception into about 10 seconds

At the opening with my photos

Tribute to Love

Soul of Southside

Arrowmont- chapter 5, conclusion

Thanks to Jodi, I have burned discs of pics for my students and they are ready to send off so I don't feel guilty about finally showing their work here.  So the topic of the class was Introduction to Painting Enamel.  What is painting enamel you might ask?  Painting enamel is basically very finely ground enamel which behaves like paint in the application process but does contain glass so it glosses when fired.  There is traditional painting enamel, which consists of ceramic pigments which are mixed in fairly specific proportions with a finely ground white or clear enamel (it has the consistency of baby powder or confectioner's sugar) and then can be mixed with either oil or water as a binder.  Thompson enamel has developed a painting enamel that behaves like water colors and also a painting enamel in an acrylic binder.  I prefer the watercolor and traditional mix varieties myself. The advantage to painting enamels is that #1, you can mix colors to make new ones, which you can't do with regular 80 mesh enamel and #2, you can create tremendous detail. I had used painting enamel as an embellishment for my cloisonne images but I'm now hooked on working immediately with the painting enamel to build the entire scene.  I will talk more about the technical aspects of painting enamels in another post.

Everyone in the class had basic enameling experience or more but no one had worked with painting enamels.  Here's what we did (keep in mind this is all jewelry scale. I don't think any one of these pieces exceeds a 2 inch maximum in an direction and most are definitely smaller than that):


This was my example piece- watercolor enamel

This was the piece I worked on during class although I finished the eyes at home. I worked from a photograph-
watercolor enamel (the photo is a little washed out)


Jodi- These were done with oil based painting enamels. She discovered it requires a lot more paint to build up color on a dark ground but it can be worth it because the contrast can be quite nice.

Liza- Liza went for an abstract series or earrings using oil based painting enamels. This photo really washes them out.
They were much more vibrant in person.
Marti- a portrait of her daughter from a photo- in process. Oil based painting enamels.

Marti- oil based painting enamels (I think)

Marti- oil based painting enamels
Mark- Mark and Pat were the most accomplished painters among us and it shows! Oil based painting enamels.

Mark- I think this one might have been the water color enamels

Mark- Mark tried lavender oil instead of our mystery "painting oil" that Thompsons supplies with the kit.
He found it is much runnier so it does washes really well.
Pat- oil based painting enamels over clear rather than the traditional white ground.

Pat- oil based painting enamel over clear. Pat applied some painting Titanium White to the top of the koi and it caused this bubbling effect, which I've encountered myself with Titanium but don't know what's causing it. It worked for the piece fortunately.

Saturday, October 9, 2010

Arrowmont- chapter 4

Okay, here are some shots of the studios and my students- all wonderful people and very talented! Many thanks to Jodi, Marti, Mark, Liza, Debbie and Pat for making my week such a joy :-) The studios in the main building are huge! There are two classrooms on either side of this hallway, where the faculty work for the season is exhibited. I did not have my act together to send a piece to the show unfortunately (such is life!). I did take quite a few shots of the work so if I get them sized, I'll include them in a future post.

The schedule went like this: ~7.30-8.30am breakfast- class started at 9. Lunch from 12-1.30 then class until 5pm. Dinner was at 5.30-6 and slides at 7pm or so. Then students could opt to go back to the studio until 1am or do whatever they liked.  Many of my students worked most nights and I was usually there until 9-10pm although one night we went to a local restaurant/bar for Trivia night and another night I went to the Aquarium. So the week was intense to say the least.  One thing I liked about Arrowmont's schedule, which most other places like this don't do, is class actually starts after dinner on Sunday night. This few hours gives the instructor time for the introduction phase of the class- passing out handouts and giving the students an idea of what to expect for the week.  This way, we can just launch right into demos and working on projects first thing Monday morning.  I also like the fact that they don't expect people to leave on Friday (we were able to work right up until 5pm) so Friday dinner and Saturday breakfast are included in the pricing structure. It's nice because the place doesn't just die on Friday night and people have a chance to socialize and relax after the intense schedule of the week.

Arrowmont has a wonderful program of work study on top of their elite residency program.  The residents do not have to teach unless they want to, they don't work for the studios, they get a stipend and they have semi-private studios in which to work as well as group housing on campus.  It's quite a plush gig and I for one applaud Arrowmont's support of emerging artists in this fashion.  This is not the norm because most places just don't have the budget to support their residents in this fashion even though I know most places would like to.

The Work Study and Studio Assistance programs allows interested individuals to come and work to maintain Arrowmont (everything from grounds keeping to janitorial- there are full time people in charge of coordinating the work) and in exchange they get room and board and then get to take a class on their off duty week.  The time frame can be just a few weeks to many weeks depending on the individual and the needs of the campus.  It's a pretty cool gig as well.  I have to say everyone I met there in any capacity: work study, studio assistants, residents and full time employees were wonderful and everyone seemed really happy and excited to be there.  It was such great energy from everyone!

Two last things about Arrowmont before I sign off for this week. The food was really good.  The kitchen does a phenomenal job of cooking for everyone and if you have special/ weird dietary needs like I do, they will bend over backwards to help you.  I did bring gluten free bread and bagels with me b/c I knew I wouldn't be able to find much of that stuff in such a remote area. I was able to stash the bread in the fridge in the kitchen and just go in and get it anytime I needed.  I don't eat red meat or non-organic chicken so they fixed fish for me.  They also always have a vegetarian option at every meal.  It is so important when going to a place like this that the food is good.  People are having a very intense week and have paid quite a pretty penny to be there and to be able to relax over good meals for a little while each day is really wonderful. And-coffee is available alllllll day!

Lastly, the rooms/ bathrooms were really clean and comfortable and the grounds were beautiful!  Thanks so much to all the Arrowmont staff for such a wonderful job!!!  Okay, I'm done gushing :-)  Enjoy the pics and next time I'll finish with what we actually made. I know I promised something like that this week....sorry.  Next time- definitely!

The door on the right was my classroom

The metals studio- and yes, it is as big as it looks!
Individual benches in the middle, soldering stations to the left and more open work areas on the right.
Anvils in the foreground.

This is the hammer room which is a smaller room between the metals studio
and the glass/ enameling studio. The door to the right goes into the enameling studio.

The studios have catwalks for visitors to see what's going on in the classes
without disturbing them.  This was my class hard at work.
A few people were still out at lunch when this shot was taken.
My messy table is in the lower right corner.

Jodi and Liza with Marti in the background
My student Mark and Donna who was visiting from the bead class

Catwalk looking down on the bead class across the hall

Just one of the wood studio rooms. The wood studio is an independent building built about 10 years ago-
beautiful gallery entrance and multiple equipment and teaching rooms

This is one of the studios in the wood building- the class was Extreme Pens.
They were doing miniature wood turning for pen blanks. It was pretty cool.


Tuesday, October 5, 2010

Interim

Last weekend was kind of busy- got to spend a good chunk of Sunday in the studio and while I was gone, get this, my wonderful hubby cleaned out the fridge and vacuumed the house then grilled us a fabulous dinner of barbecued chicken, corn on the cob, garlic bulbs and salad!  What a great way to start the week! 

I've got photos from Arrowmont ready, just haven't had time for a thoughtful post to go with them so I'm planning for Thursday- Saturday to get that done.  Just FYI.  I've got some other topics already lined up- using a rotary tumbler may be the next one but we'll see.  There's lots going on art-wise to post!  I can't remember if I mentioned it, but not only do I work in metals, I also do photography and digital art so this blog is also going to be about that and other art happenings I get mixed up in.  I discovered how hard it was to keep one blog going so rather than have different blogs for different topics, I'm just going to spill my guts here.  After all, none of us are one dimensional people or artists, right?  Hope you find it all good :-)

Sunday, September 26, 2010

Arrowmont- chapter 3

Well, I'm taking a little aside from what actually went on in class and including some photos this week of the surprisingly good aquarium that is literally across the street from Arrowmont.  Don't let the fact that the aquarium is a Ripley's Believe or Not franchise discourage you because it's accredited by the Association of Zoos and Aquariums and is really quite impressive.  They stay open until 11pm so it's easy to walk on over after slides one evening if you've decided to take a break from working late in the studio and check out the denizens of the deep.  I went with Chad Alice Hagen, felt and fiber artist extraordinaire, who was also teaching that week.  If I hadn't been teaching myself, I'd have wanted to take both the fiber and bead classes that were being offered on the other side of the hall!  Next week, I will show you what we worked on in class and what the studios looked like but for now, enjoy these piscine pics!


Jellyfish

A Sawfish- amazing creature!

Sawfish mouth and gills- looks like eyes but they're not

Jaws music, please

Squid couple

Random fish but such a clear shot even through the thick glass, I couldn't resist including it

There were lots of fish....

Chad Alice Hagen in the Penguin Pod- This was neat. You crawled through a tunnel and popped right up
in the midst of the penguins and they weren't disturbed in the least,although there were idiots ahead of us
banging on the plexiglass to try and get the penguins to do something.
Sometimes I wonder who really belongs in the cage.....
Penguin Feet- I don't know why this picture is so small....

Saturday, September 18, 2010

Arrowmont- chapter 2

Here are some more shots of Arrowmont and of Gatlinburg, which is a very odd town. It is just a little ways down the road from the super tacky tourist strip in Sieverville, where you can find Dollywood and other like ilk, but it is also right at the entrance to the Smoky Mountains National Park so there's basically one main strip that's super tacky and it's completely surrounded by these beautiful mountains. Gatlinburg gets about 10 million visitors a year but there are only 3,500 residents in the town. Arrowmont is situated just off that main road but once you round the drive, you'd hardly know all that stuff was there apart from the occasional noise that filters through the trees. It's an interesting mix. There's the appeal of feeling secluded (I missed getting to see the black bear wander through campus one morning) while on the grounds of the school but you can walk down the drive and be immersed in a full on carnival-like tourist strip complete with cheesy arcades, festival food (all the homemade fudge you can eat), shopping (as long as mostly what you want to buy are purses or imitation Japanese swords), etc. When I was trying to explain it to my husband I compared it to Venice Beach in CA but without the body builders or ocean and with more permanent architecture. It's really quite an experience. But of course, it's only an interesting diversion for the real reason to be there, which is Arrowmont. Blogger has decided it doesn't want to upload any more photos for this post for some reason so I'll have to post more later. Enjoy!

Stuart House- another of the older structures on campus


Looking over the ceramics kilns into town. The Aquarium is that blue thing in the distance.


The main strip in Gatlinburg- wish I'd taken more photos! This one is soooo tame!


Yes- free moonshine tastings. Yes, I had some.


This is the Ogle Cabin, the oldest cabin that was built in the area in 1807.
The furnishings are as close to period as they could get (ignore the modern
conveniences for the volunteer who sits the place- very nice lady and very
informed)


The other side of the cabin


The Salt and Pepper Museum that, alas, I did not have time to go into before I had to leave

Sunday, September 12, 2010

Arrowmont

Well, thanks to Mary Chuduk, I had the privilege to teach at Arrowmont in August. It was absolutely wonderful!!! For those of you who may be unfamiliar with it, Arrowmont is an arts and crafts school in Gatlinburg, TN that was originally founded in 1912 as a settlement school for rural farm kids to get an education. The school was dedicated as a year-round arts facility in 1968 although summers at the school had been devoted to arts and crafts workshops for many years prior. Today, it is one of the premiere locations to take week+ long intensive workshops in many media: painting/ drawing, wood, clay, photography, metals and enameling, glass fusing, paper, book and fiber arts. To view their website, click here

For Arrowmont, I developed a class on painting enamels, something that is not widely taught but a technique I've been experimenting with for a while now. I went looking for a photo of the main sample I made but by golly, I must not have take one so that image will have to wait for next time. For now, here are some photos of Arrowmont and one of the countryside. I'll post more later. Enjoy!

On the way to Arrowmont- the beautiful east TN scenery


This is the house I stayed in- Staff House


Inside the lounge between the sleeping quarters and the cafeteria at Staff House


Patio off the Library and our studios


View down the driveway at Arrowmont. The main building is on the left


The Red Barn, one of the oldest buildings on campus

Friday, September 10, 2010

Mesa Arts Center Shindig Tonight!

The Mesa Arts Center is having their big season kick-off tonight from 6-10. There will be performances, the gallery will be open and there will be art demonstrations all over. I will be working in the enameling studio so come on by to chat or ask questions. A good time will be had by all! :-)

Friday, July 23, 2010

Okay- yes, I'm soooo late getting back to this

Life has been interesting. I reported last fall that my South Mountain teaching gig had fallen through and I was lucky that Polly, my wonderful boss at the Mesa Arts Center had several classes that needed covering for the fall. I had a free tuition voucher to use from all my community college teaching so I signed up to re-learn Adobe Flash at Mesa Community College thinking I'd have time on my hands to go back to school a little. Well, I was casting about for a part time job and found an ad, somewhat old, on Craig's List for an e-commerce administrator at the Heard Museum here in Phoenix. I figured, since the ad was old, they'd probably already hired someone, but I applied anyway. Did I mention I also do web and graphic design on top of metals? Yep.

Well gosh darn it, I got an email back in a few hours and one thing led to another and I suddenly had a 4 day a week steady gig at the beautiful Heard Museum with benefits, cool id badge and everything! I've been working there since November 2 (finished my MAC classes and the Flash class). I've had Wednesdays off to do freelance/ teach at MAC/ work in the studio but that may change come October because my boss at the Heard wants me to go to 5 days a week. I'm still going to teach at MAC in the evening and I've already told my husband that there are some weekend days that are just going to have to be studio days until we move into our house (did I mention we bought a house right at the bottom of the housing market- fixer-upper but a real steal) and he builds me a studio at home.

Okay, so. This is why I haven't had a chance to get back to the blog. However, my class at Arrowmont made so I am frantically getting ready to teach an introduction to painting enamels, which is a new class for me to teach even though I've been doing it a long time. It's always stressful when it's a new class, even when you know the info. At least I know how I do it. I'm trying to make sure I can cover multiple methods and probably over thinking and over samples-ing the whole thing. I do that :-)

So I'm planning on having photos of the trip and the class to share after mid- August and this has also re-galvanized my resolve to get into the studio more.

And I haven't forgotten I need to post the links to those fabulous enamelists I went to the Grand Canyon with (gasp!) last June! So to end this post, I'm going to include their urls and a pic we took last June (before I wacked my hair off). Hope you enjoy.

Visit www.marychuduk.com and www.debbiesheezel.com.au to see some incredible enameled art!

Thursday, September 10, 2009

MAC Fall Season Shindig

Come on out to the Mesa Arts Center this Friday September 11 for their Fall Season Kick-Off Party. It's free, kid-friendly and we'll be demonstrating cuttle-fish/ plaster casting (jewelry scale). The Mesa Arts Center is located at 1 East Main Street, Mesa AZ and the event time is from 6-10pm.

There is still time to sign up for classes as well. Check out the MAC metals website for details. Hope to see you tomorrow!
:-)

Friday, September 4, 2009

Fall Workshops in the Valley

It's time again to think of classes for fall. The Phoenix Center for the Arts and the Mesa Arts Center both have some great classes planned for fall. Click the links to go to their respective sites!
I will be offering several workshops this fall as well. Check out my classes page for details. I will be making an extra post shortly featuring an incredible enamelist I met this summer. Stay tuned :-)