 |
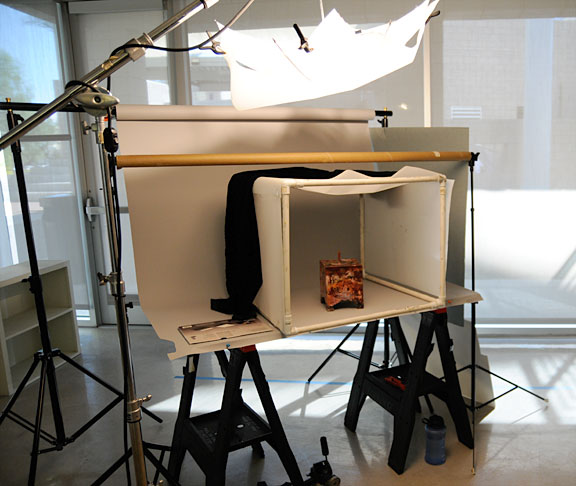
| Michael's set up |
 | |
| An example of how Michael's photography looks with this set up |
My set up at work involves a gifted piece of black photo paper (I need to get with my boss and see about ordering some rolls- they aren't that pricey) and two lights with umbrellas. I turn the lights completely up facing the ceiling and that causes the light to bounce back off the ceiling and the umbrellas to diffuse the photo area. It reverses my light to dark though so the floor of the set up is dark and the vertical wall gets lighter. I'm sure I can rig something up to mimic Michael's set up but it may have to wait until after high season because I'm way too busy having to get product online right now to take time out to mess with the set up.
 |
| my set up |
This was shot in my light tent, which I don't like but it's not bad, eh? I'll have to take a pic of what my light tent looks like but here's what Michael uses for a light tent:
 |
| Michael's home made light tent- pvc and a vellum-like heat resistant photo film used in theatre |
Another issue with my set up is that I don't have time to measure for optimal depth of field so I just have to crank up the depth of field as high as possible to accommodate the different sized pieces and different focal lengths I need to get the shot. I can't back away from my setup by more than 4 or 5 feet, so the background is almost always in focus. That makes for additional grain in the image no matter what the ISO but for me right now it's unavoidable. Here's the other side of my office/ studio:
Michael's class was really great and also allowed me to see that I was doing some things as well as I could so I've stopped beating myself up a bit on the struggle to get good shots. Even with all of his expertise and the right equipment, he still struggles with getting the best shots possible. And for you jeweler's out there, he says that's the hardest stuff he ever has to shoot! I think he's planning on teaching it in the spring (it's a weekend workshop) and I highly recommend it if you need better shots of your work for shows or galleries and you need to take them yourself. If you can afford not to have to take them yourself, I recommend you hire Michael because he's really good :-)
About equipment: the product shots you see here that I took were shot with an old Nikon d40 with a Nikkor ~17-55mm lens. My lights are tungsten lights. The camera ISO is set to 200 and to Aperture mode. I have the white balance set to incandescent +2, which means tungsten on this camera. I adjust the exposure rather than the shutter speed to bracket because that's faster. I do not have an external light meter. Every image is brought into Photoshop CS4. The most common adjustments outside of cropping and sizing for the web are levels and selective color (using layers). I also do a lot of background fuzz cleanup with the patch tool. BTW, sizing for the web means reducing the dpi to 72, which is the highest resolution for the web. You do not want an image that is 300 dpi ever to go up onto the web. It just hogs memory and causes the whole system to bog down. I also bring the image width and height down and compress all jpegs for web viewing. The quality is usually between 60-80%.
My personal camera is a Nikon D300 and my main lens is a Tamron 17-55mm, which I love. All the other photos as well as just about any photo you see here or on my design website was shot with the D300. My next big purchase for photography is going to be a tripod over a flash. I learned another thing in Michael's class, keeping the ISO down makes for better photos but that also frequently makes for longer exposures. I need a tripod for a lot of the work I really like to do. As of my research right now, I'm leaning towards an RRS ball head with quick release plate and I'm pretty sure I'll get that but the legs I really want are from Gtizo and they are quite pricey so I may go with an Induro set for about half the cost. I think they'll work out just fine. That little gift to self will have to wait until after the holidays though :-) Sigh, something to dream about....


No comments:
Post a Comment